I’m headed west for a few weeks!
The current plan is to ride the Stagecoach 400 route, then head over to Death Valley for a dirt road tour, perhaps weaving together a loop based on the new Reno-Vegas bikepacking route. If there’s time… and the weather is willing… I’d love to ride the Tour de Los Padres too and see the Carrizo plains.
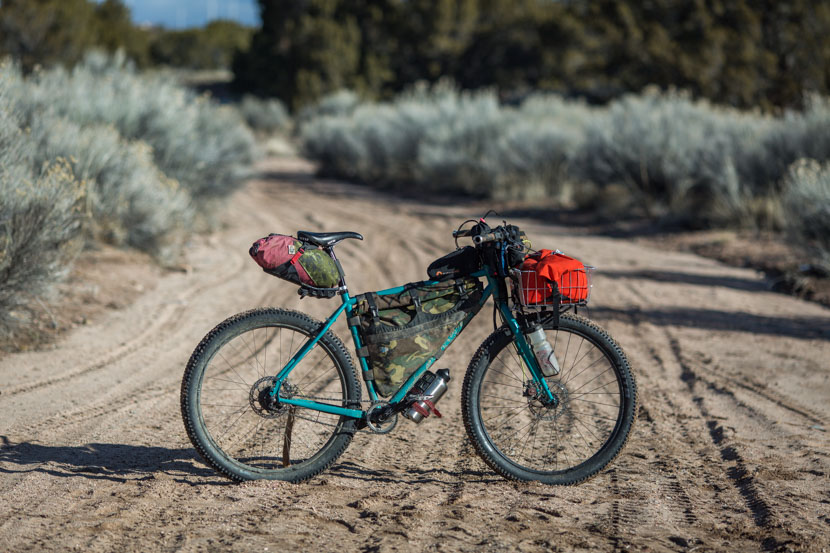
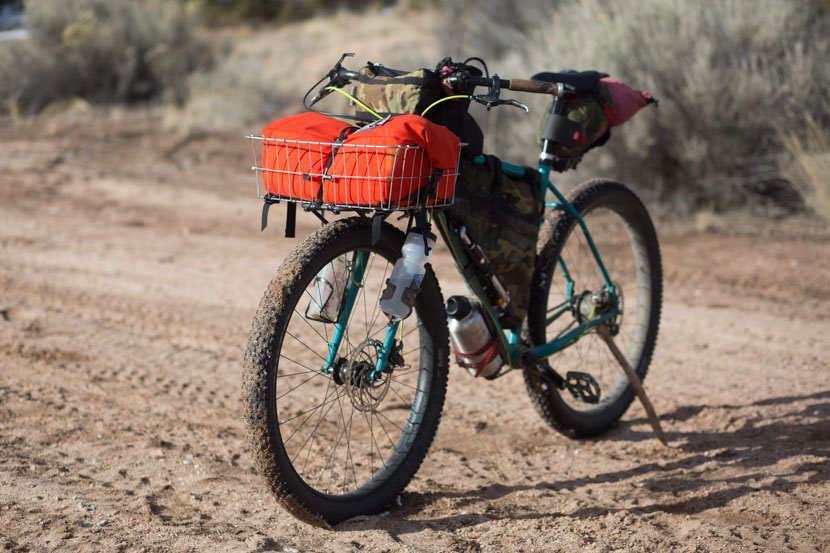
To those who find such minutiae interesting… here’s my setup for the trip, based around the classic and venerated Wald 139 basket (-:
I’m a relatively late but enthusiastic convert to the ‘basketpacking’. While it’s not my first choice for technical endeavours like the Colorado Trail, it’s a setup that suits both bicycle travel and car-free homelife surprisingly well. It goes something like this. Pack your basket to the gills with around town shopping. Ride it empty on local trails. Or escape for the weekend with camping gear lashed down. All on one humble bike.
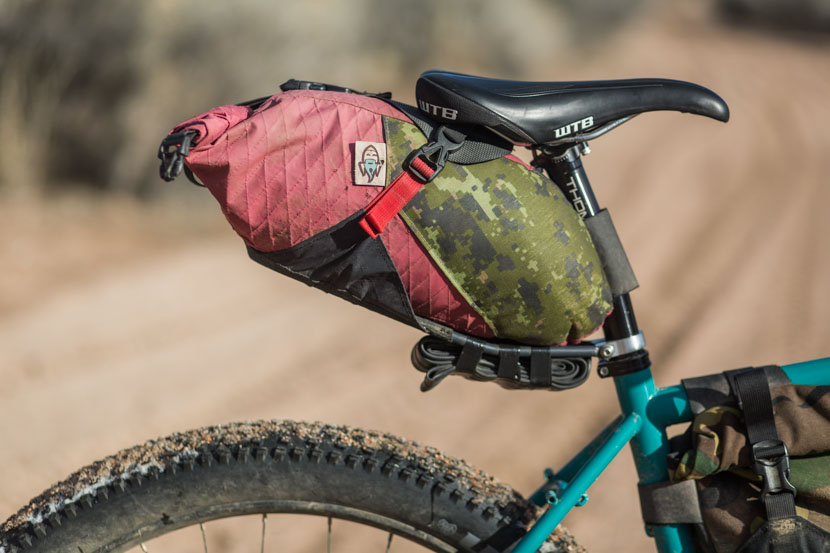
Of note to gear nerds, there’s certainly a weight penalty to running a wire basket and front rack, compared to a lean and minimal roll bikepacking-style rollbag. With cargo cantilevered further forward, steering is affected too, though it’s relatively easy to get used to. To minimise its effect, I toyed with the idea of running the 139’s more compact and lighter sibling on this trip – the Wald 137/Swift Sugarloaf/Nitto/Riv Mark’s Rack combo. But I love Surly’s super stout 8-Pack rack and I figured the extra space would be handy, given the slightly fluid/unplanned nature of the next few weeks. And given that I usually run a Carradice Super C (910g) up front, the eye-catching, all engulfing Monkey Wrench Bag is actually lighter at 620g.
Some weights to deliberate over:
Rivendell/Nitto Mark’s Rack and Wald 137 + Surly Loop strap: 864g
Surly 8 Pack Rack and Wald 139 + Surly Loop strap: 1600g
Also add: a Swift Sugarloaf at 350g or a Monkey Wrench Bag at 620g.
Anyway, I’ll see how it goes. After all.. while ‘ultralight’ is great, ‘lightish’ is still good…
As for the Tumbleweed Prospector, you can find out more about this bike by reading a recent post, over at Bikepacking.com.
The Tumbleweed Prospector. Part Fat, part Plus… all bike!
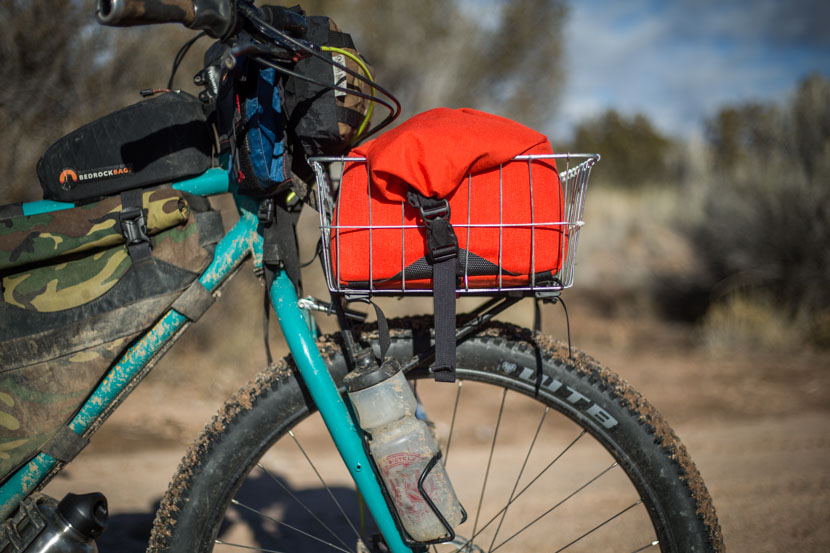
Most of the time, I run a Carradice Super C Saddlebag up front to carry my DLSR. This time, my camera will be stashed within a Monkey Wrench Bag, atop Surly’s stout 8-Pack rack.
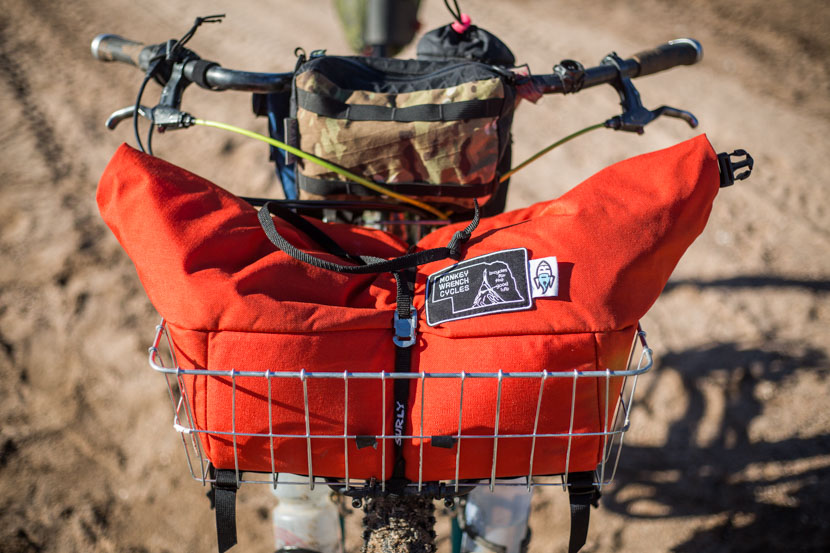
The DSLR rests on a soft bed of clothes and a sleeping bag, with plenty of room for a long lens attached. A Surly Loop Junk Strap keeps everything securely in place. It’s a speedy process to loosen the strap and open the bag to grab my camera. After a quick re-roll, I’m ready to go.
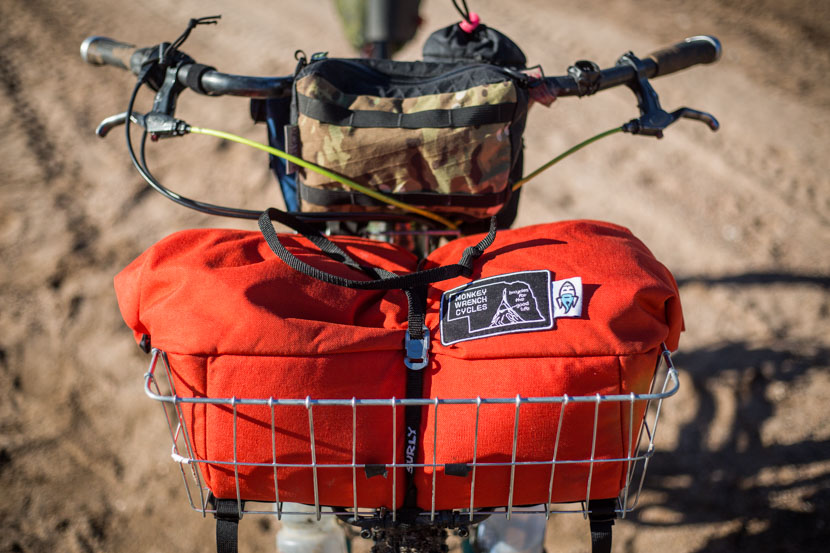
Should things become rowdy on the trail, I can buckle it down the Monkey Wrench bag on either side. The bag itself is attached to the base of the basket with a number of straps, so it’s not especially easy to remove. Wire baskets perks: they provide lots of extra lashing points to keep everything firmly in place. And they’re surprisingly hardy. This one has been all over Bolivia and lived to tell the tale.
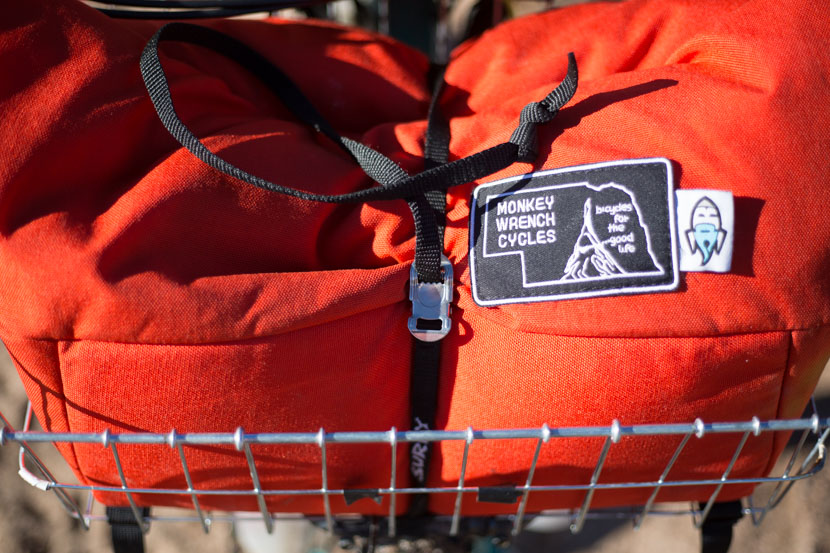
Here’s a close-up. The strap is looped around the front and rear of the rack, keeping the bag extra secure. The strap’s tail is tied off, so I don’t need to keep rethreading it through the metal buckle. Wire basket upside? No need to fuss with cable routing, as you do with a bikepacking-style handlebar bag. Wire basket downside? A little awkward on buses, train, or in tight spaces.
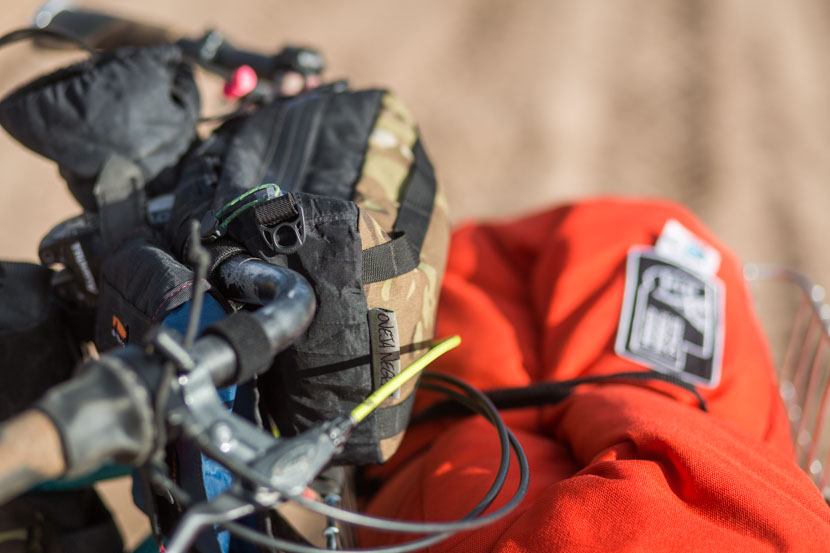
To keep sunglasses and snacks handy, I’m running Oveja Negra’s oh-so-perfect Lunchbox. Wrapped around my Jones Bend H-bars, it stays tenaciously in place whether strapped to a basket, wrapped around a roll bag, or run solo for a day ride.
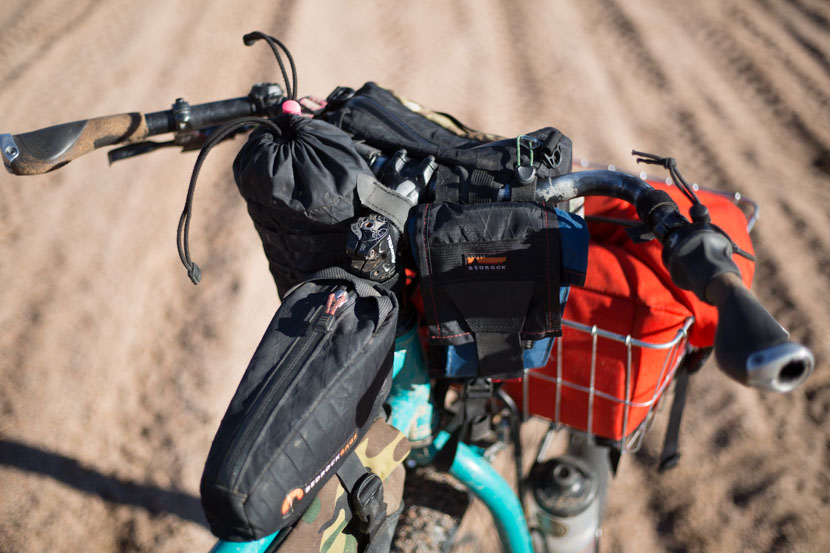
Elsewhere, I have a Carsick Design Arch Rock padded lens bag to stow an extra lens, with a Tapeats Handlebar Bag for quick, one-handed access to my iPhone, which I use to navigate dirt roads.
At the back, my faithful Porcelain Rocket Mr Fusion (Version 1) carries a tent, waterproof and extra food, as needed.
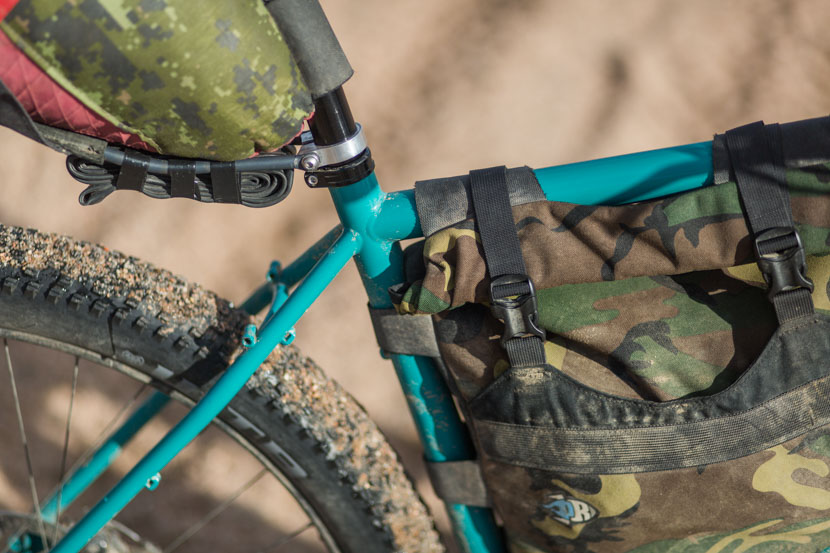
The zip-free Porcelain Rocket Orbiter gulps down a stove, spare parts, a water bladder, and food.
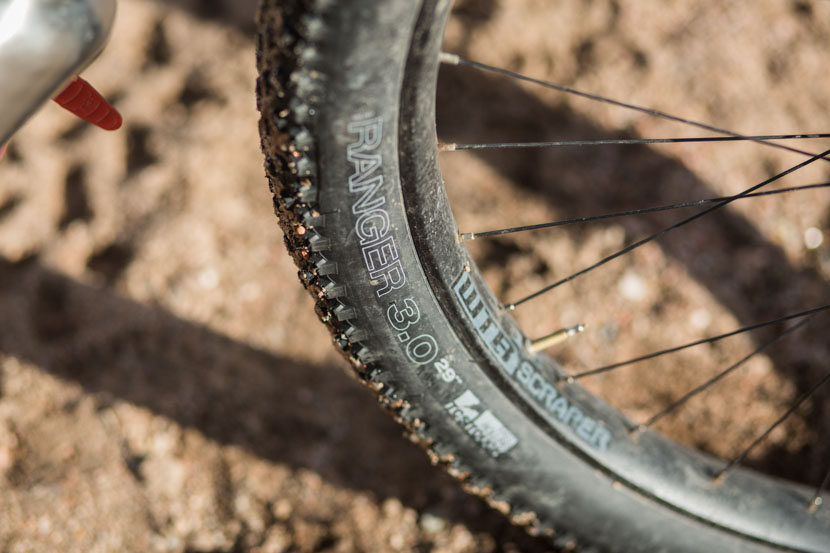
I’ve been impressed with WTB’s Ranger Tough tire, which I’ve been running for the last couple of months around town. This will be the first longer trip using them.
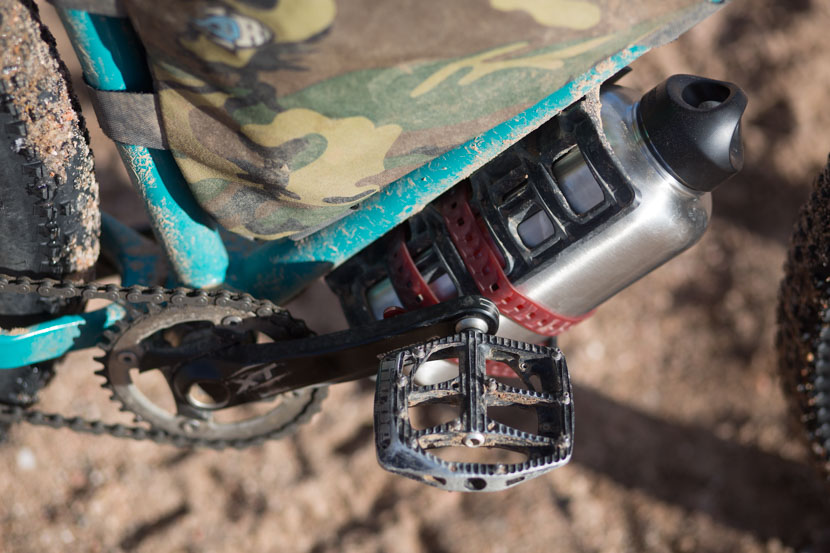
Now I’ve weaned myself off SPDs, Hope’s F20s are my pedals of choice. For extra H2O capacity, I’m running an Anything Cage/64oz Klean Kanteen combo. A 2-2.5l plastic bottle is lighter but the Kleen Kanteen lasts longer and is more sustainable.
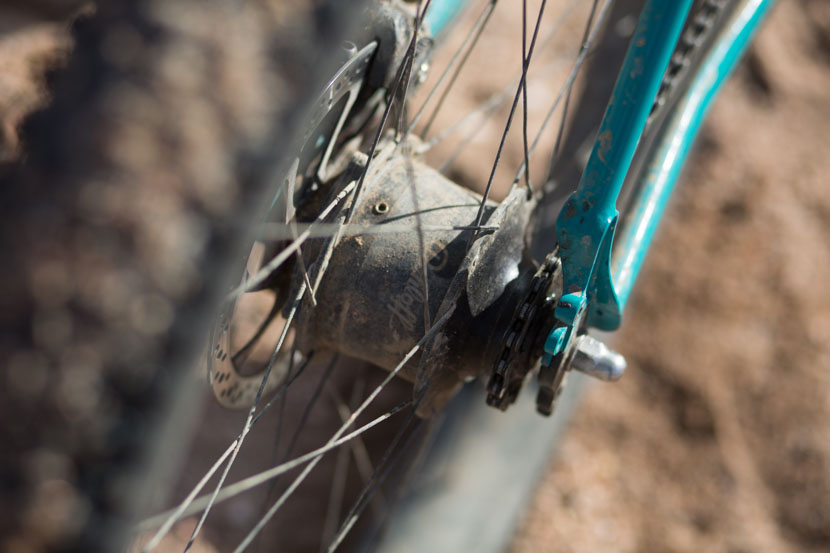
The Tumbleweed is built around a 135mm Rohloff Speedhub. I’ve had mine for a number of years; it’s joined me across South America and beyond. Up front, there’s a SON 28/Sinewave Revolution on charging duties, keeping an iPhone and various accessories alive.
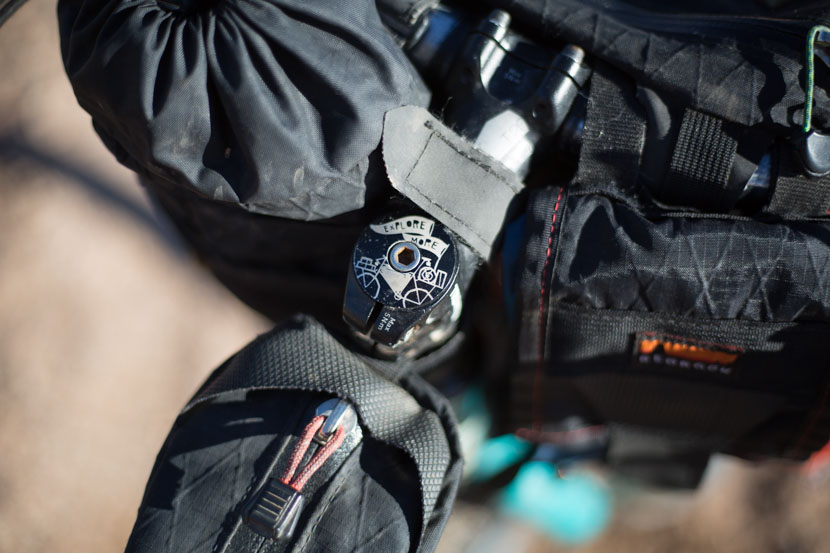
All time favourite stem cap, courtesy of Comrade Cycles in Chicago.
And there you have it. As it is, I can’t claim this setup is especially light (though everything has been weighed and deliberated over). But it’s tidy, relatively compact, practical, keeps my DLSR camera protected, and gives me room to haul extra food/bags of tacos/laptop, when required. Plus, it supports small businesses who make products I admire.

Awesome littel writeup. I make films from my bike, and am trying to figure out how to move from a dirt touring to a bikepacking setup… These are all things I am thinking about, especially the camera sollution. Thanks.
Cheers Jimmy. There’s lots of ways to do it, depending on your setup. My friend Jay used a Porcelain Rocket DLSR Slinger to carry his GH4. Personally, I like packing my camera on clothes to help protect it. I always try and avoid a backpack at all costs, though they’re handy on more technical trails.
It’s not about the camera 😉
I’m happy to be receiving these posts again. Inspiring stuff. Thanks mate..
Matt,
Western Australia
Thanks for the comment Matt, much appreciated.
Shopping basket seems the way to go. Where do you keep your umbrella?
Handlebar rolls are great except for cameras; I’ve missed a lot of shots because I’ve been too slow/lazy to get my camera out. Last summer, I went back to the classic touring handlebar bag (and swapped the loop bar for the bend bar) just for quick camera/valuables access. The Monkey Wrench Bag option looks like a good way to go. Might have to go and say hello to Scott…
Nothing beats the old handlebar bag for classic, waterproof camera handiness! I’m a bend bar fan too!
Both the Swift Sugarloaf and the Monkey Wrench Bag are great basket-friendly options.
Thanks Cass for the write up.New to bikepacking,and like to travel for a long time worldwide, I’m still struggling to find the set-up and right tires which will allow me to carry extra food and water,also do it all tires,when needed during longer stretches on roads between trails, whilst trying to stay as minimalist as possible.There doesn’t seem to be many long-term world touring with a Bikepacking set-up.
The basket could be a possibility.Noted!
Hi Ian,
The wire basket approach isn’t the most conventional amongst long distance tourers… but I like it! It’s a bit bulky when travelling by plane/bus, but easily removed if necessary. As I say, it’s not my No 1 choice for hike-a-bike style minimal bikepacking but works well for most other styles of dirt road touring.
All the best with your travels!
So happy your blog has been resurrected Cass, it’s always been my favourite.
Cheers Harry! I’ve been accumulating thoughts/stuff I’d like to share… so tentatively aiming for a post a week, even if it’s short and sweet.
We’ll see…
Bien compadre! Que buen post!
Thank you pana.
I will try and go lighter for the CT… or I won’t have a chance of keeping up (-;
Ah yes. I’ve missed your gear thoughts and photo commentaries 🙂
Cheers Chris! Always fun to ponder gear setups, right? (-;
Happy to see you writing again,.. useful, inspiring things 🙂
Basket power (-:
My favorite way to secure a bag in a basket (or rack) is the bungee straps with a ball on one end (aka canopy straps). Loop the one end around itself, and the other to the opposite side of the basket with the ball. Adding a small, snug zip tie provides enough friction to keep the ball from coming out. They are always attached to the rack and ready to use, but can be easily removed/re-installed as needed.
I put two straps front to back on my basket, and can simply pull them around the edges of the basket and out of the way when I want to load the bag. Once loaded, release the straps back over the load. You can adjust the length by changing their secured spot on the basket, or even pulling just one side of the loop.
I also keep two of the newer surly loop junk straps around the external perimeter of the rack just in case I need more strapping power for special loads. They also make a temporary u-lock holder.
Reload makes a larger, cheaper basket bag without a zipper for the wald basket. Just the roll the flap closed, and use the basket straps to keep it closed.
http://www.reloadbags.com/category-s/2047.htm
Thank you for sharing your thoughts, Jon.
I mostly ride in the deserts and pumice mountains in and around the Eastern Sierra, CA. I’m curious about your opinions/experiences with fat vs. plus sized tires. I’ve been on 29×2.2 for some time now. They’re great on the harder surfaces but under-gunned for the softer stuff. I’d like to step up to fatter setup, but I’m just not sure how fat is fat enough???
I’ve recently had a chance to try B+ tires. I have to say, I’m really impressed. A definite improvement in the sand. And almost as nimble-feeling as a 29er wheelset. Not as capable through arroyos as 4in+ tyres for sure. But great all rounders.
Great article and thanks for the links. Things have come a long way since the days when putting a basket on a nice bike was considered crass. Wald all the way.
Thanks Dave.
Daniel provided a Mark’s Rack with the Tumbleweed frameset I’m trying out. I’ve always been happy with my Nitto M18 but have to say, it’s a real improvement.
Oh, and I’m planning a write-up on the ShopSack soon. Love it!
Glad to see your blog back in action!
Been playing around with the Wald baskets and various rack set-ups for the last year and a half or so on a couple of my bikes. Did a dirt tour with it on my Surly Ogre last year. Worked well although I missed being able to see around my front wheel when maneuvering through rocky sections. Also had a mishap with the fully loaded rack/basket shaking loose on me on a bumpy extended downhill. Miraculously escaped serious injury and threw a safety strap on connecting the rack/basket to the head tube for some added security.
Would be stoked to see your take on Los Padres/Carrizo Plain if you make it there while out west. That’s my backyard! The wildflower bloom later this spring in the Carrizo is lining up to be an exceptional one with all this rain.
I’m a big fan of the wald + bag setup. A Mountainsmith Cube bag (cheap! They’re on sale frequent) fits in there just right. Here’s a write up on that setup I used last spring when I did a section of the C&O with my son:
http://www.alltogetheroutthere.com/bike-camping-on-co-canal/
Glad to see you updating your site again, it’s always a source of inspiration!
Hello Cass,
A question about your rack/basket setup: Was the 8-Pack rack sufficient for the larger Wald basket, or would you normally lean toward something more like the 24-Pack, or even the Pass and Stow for a basked of that size?
Thank you.
Cass glad your back ,missed the write ups and the photos . What your average weight of your bike and gear loaded for traveling . What is the weight of the bike naked , I have always wondered .
Rgds Jeff
How did the Shimano saints work out for you likes and dislikes ,how is it working out with the Hope pedals . I am currently considering a pair of Spanky Oozy pedals .
Rgds Jeff NYC
Cass,
Hioe you have a great ride on the Stagecoach 400. If you’re still in the area, I’d love to meet up. We have a spare room in our house in San Diego if you need anything. Contact me via email.
Cheers,
John
Just got back. Fantastic ride – snow, sand, rocks, cacti, a bit of everything!
I’ll drop you a line!
Good to see you back on the blog…also looking forward to your take on the WTB Ranger Tough tyres, particularly the wear factor and puncture resistance.
So far so good. I tried a set of the lightweight versions and didn’t find the sidewalls hardy enough for the kind of riding I do. But these Tough versions seem to be an improvement. In my experience, the Chronicles wear relatively slowly. But I prefer the way the Rangers steer, and the sidewalls may well be tougher too. Old fashioned puncture resistance isn’t really an issue as I always run my tires tubeless.
Cass, great to see you back on the blog. Really interesting review on something I’ve been thinking about for my Sonder Camino. Not yet sure how the rack will play nicely with the forks, but will be thinking about that. I’m guessing that aside from camera and gear, you also benefit from it as a kid-friendly option too? I’m still trying to convince my two boys to start cold and finish warm, but while I can cope with my own faff using my super 8, I’m always wishing I had near to hand stowage options for the boys…
Yes, super convenient in terms of providing space to stow layers – more soft packing for the camera! Of course, I try and keep it light up front to minimise any negative effects on handling. But throwing in some extra layers doesn’t seem to do much harm (-:
Cass,
Good to read your post again. Can’t wait for the photos and story.I always try to catch your posts on Logan’so site. Which bar do you prefer ,the Jones bend bar or Loop?
Dave
Hey,
happy to go through all of your recommendation.
By the way, which camera you’re using? Your picture shot really looks great.
Thanks! It’s Canon 5D.
Love all of the info on your site! I was wondering if you could share what kind of spacer you used with your son generator hub in order to fit it into that 135 mm fork on the Tumbleweed prospector? Issues with needing to offset the rim or otherwise fit the disk brake? Looking forward to hearing more about your travels.
It’s a 135mm Son, so no issues at all. As far as I know, the 100mm version aren’t retrofittable. But I could be wrong there.
Hi Cass,
I’m wondering if you have ever ended up needing to throw a tube in the Scrapers on the trail, and if so, did it work/fit ok? I’m building up some wheels for a new Troll–i40 Scrapers and 3.0 Rangers–and I’ve heard that the tire/rim combo is too tight to fit a tube. Sounds funny, I know. Any experience that would say otherwise? I’m a bit worried that I’ll get in a situation when I lose my tubeless seal, not be able to get it reset, and be out of luck. Thanks for any help!
Bob
I’ve only used i45s and there’s no issue fitting a tube in there (29+ variety). Can’t imagine i40s would be any different… Bear in mind it’s a tight interface between tire and rim. It can take some serious muscle to mount the tire. I’ve had to use a Lezyne metal lever at times.
Thanks for the input, Cass! Not looking forward to mounting them and here’s to hoping it doesn’t have to be done too often. Metal tire levers are in my future, though.
One more question for you: Have you tried to mount a Tubus Vega out back with the Scraper/3.0 Ranger combo? I’m curious if it fits. I’m leaning away from my Mr. Fusion V. 2 and toward my trusty Carradice Super C saddlebag paired with a Vega (which I don’t currently own) on my new Troll because I like the easy access of a saddlebag vs. the seat pack. I know you’ve gone both directions at different points in time, and that you’re currently enjoying the XL Mr. Fusion, but the Vega looks super slick and I don’t mind sacrificing a bit of weight for ease of use. Thanks for any help on this!
I’ve been running a 137 attached to a Surly 8-Pack for a while now. It’s solid and practical and fits an REI Flash 18 with ease. I fashioned an L-bracket (really an OMM canti rack mount) to secure a K-Lite on the front of the rack, keeping it wobble-free and its wide beam nearly unobstructed.
I recently switched my front tire (Surly ET 26 x 2.5) to a WTC Ranger Tough 26 x 3 (Surly Troll + Rabbit Hole rims).
I have a trip coming up in a few days — Seattle to Portland — and I was thinking of running a Revelate Harness with their updated Periphery Pocket (in red!) instead of the basket; but, I think the Wald 137 already in place may be a better choice. I pretty sure I can use the Periphery Pocket with drybags and the basket. I planned to use the Surly rack to hold up the Harness and drybags, but that seems too complicated.
A combination of a small size frame and probably-too-low handlebars (Jones H-Bar, no spacers) makes bar to tire clearance pretty tight; too much to fit a Wald 139 on the rack without cutting it down.
Pro tip: I often use large Tyvek envelopes from the USPS to line the bottom of the basket to keep from grinding holes in fabric, and also as a bit of a fender.